Build an Interactive Memory Card Game: Vanilla JS Tutorial | AI Valley Zirakpur
Welcome to another exciting hands-on web development build! At AI Valley in Zirakpur, our students build dynamic, interactive projects just like this every single week. Creating real, playable games is one of the most effective ways to master coding logic, DOM manipulation, and web design. In this step-by-step tutorial, you will build a fully functional Memory Card Matching Game using raw HTML, CSS, and vanilla JavaScript. If you've been looking to dive into STEM education and tech skill-building in the Tricity area, this project is the perfect launchpad for your coding journey.
π― What You'll Build
You will build a classic memory match game where players click cards to flip them over and reveal hidden emojis. If two flipped cards match, they stay face-up. If they don't, they automatically flip back down after a short delay. The game will track the number of moves taken.
This is exactly the kind of highly interactive, logic-driven project our introductory web development students in Chandigarh and Mohali build to solidify their understanding of JavaScript state management and CSS animations.
Why Vanilla JavaScript?
Before diving into heavy frameworks like React or Angular, it is crucial to understand "Vanilla" (plain) JavaScript. Building this game without external libraries ensures you truly understand how the browser processes logic, handles user events, and manipulates the Document Object Model (DOM).π Prerequisites & Materials
To follow this tutorial, you don't need any expensive software or high-end computers. You just need a few free, industry-standard tools:
.html, .css, .js) on your computer.Note: If you are searching for the best coding classes for kids in Panchkula or surrounding areas and prefer learning in a structured, hands-on environment, our physical labs provide all the necessary computers, software, and expert guidance!
Step 1: Setting Up the Semantic HTML Structure
The foundation of any web application is HTML (HyperText Markup Language). It provides the structural skeleton of the page. We will use modern, semantic HTML5 tags to hold our game board, a title, and a moves counter.

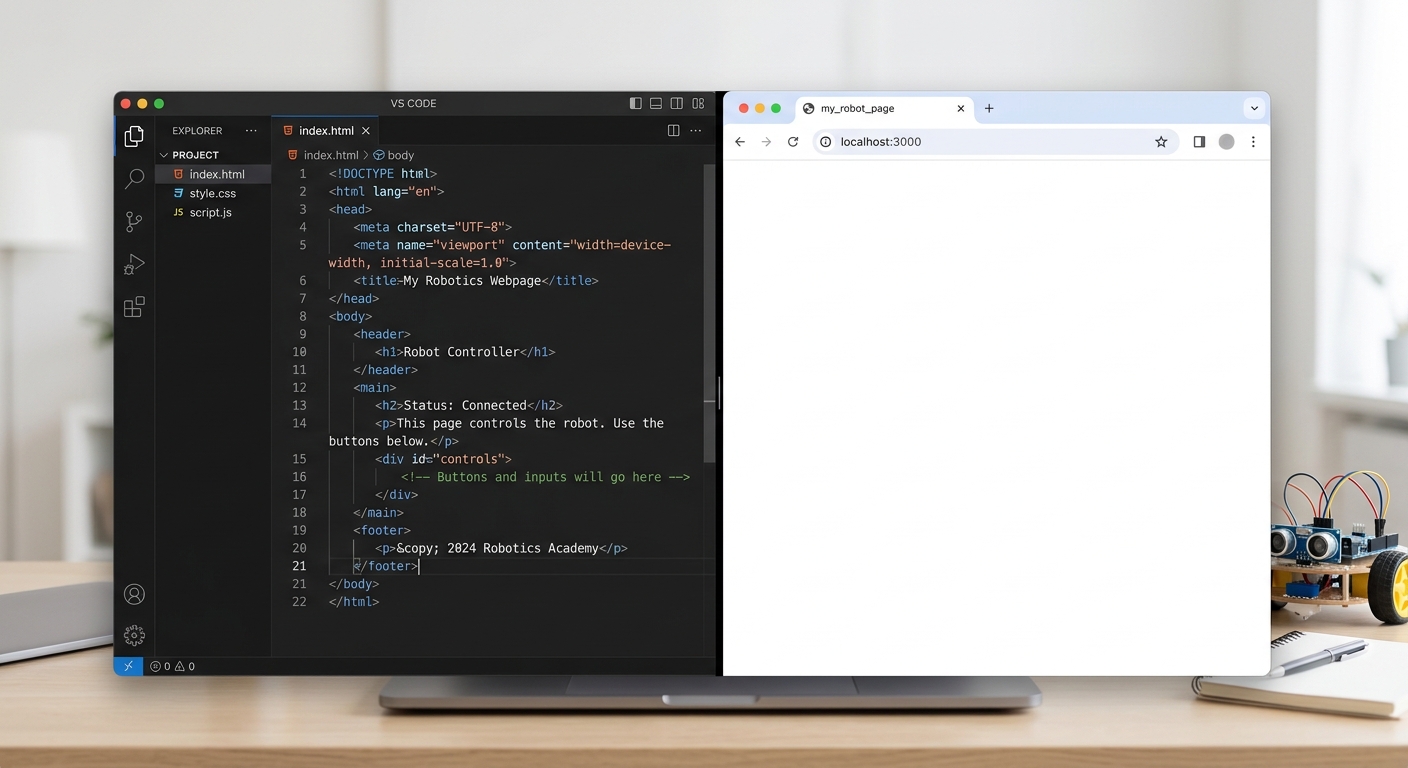
A screenshot of a code editor showing the basic index.html structure with a blank white browser window next to it.
Create a new folder on your computer named memory-game, open it in VS Code, and create a file named index.html. Add the following code:
What this code does:
tag ensures your game will look good on mobile devices as well as desktop screens. holds a with an ID of moves. We will use JavaScript later to target this exact ID and update the number every time the player attempts a match.
The acts as an empty container. Instead of hard-coding 12 different cards in our HTML file, we will generate them dynamically using JavaScript. This makes the game easily scalable if we want to add more levels later.
The tag links our logic file. Placing it at the end of the ensures the visual elements load before the script tries to interact with them. Step 2: Styling the Game Board and Cards with CSS
Next, we need to bring our game to life visually. We will use CSS Grid to perfectly align our cards and CSS 3D Transforms to create a realistic "flipping" animation. In our top-rated web development courses at AI Valley, we always emphasize that mastering CSS layouts is just as important as writing logic!

A visual diagram explaining CSS 3D transforms, showing a card with a front face and a back face positioned back-to-back.
Create a file named style.css in the same folder and add this code:
What this code does:
perspective: 1000px; gives the game board a 3D depth. Without this, the flip animation looks flat, like a piece of paper scaling down and up.
transform-style: preserve-3d; ensures that the front and back faces exist independently in a 3D space.
backface-visibility: hidden; is the magic CSS trick! It ensures that when a card face is rotated 180 degrees away from the user, it becomes completely invisible, seamlessly revealing the face positioned behind it.
We set up a flexible Grid layout using .memory-game with 4 columns (grid-template-columns: repeat(4, 1fr)), resulting in a perfect 4x3 grid for our 12 cards. Step 3: Generating and Shuffling the Deck with JavaScript
Now, let's jump into the core logic. We need to create an array of base emojis, duplicate them so that every emoji has a matching pair, and randomly shuffle them. Working with arrays, loops, and data structures are fundamental concepts covered extensively in our beginner modules.

An illustration showing an array of emojis being duplicated into pairs and then shuffled into a random order.
Create a file named script.js and add the following initialization code:
What this code does:
The Spread Operator (...) is a modern JavaScript feature that extracts the contents of baseEmojis. By writing [...baseEmojis, ...baseEmojis], we efficiently create a new array containing exactly two of every emoji.
The shuffle() function uses the Fisher-Yates algorithm. It loops through the array backward, swapping the current item with a random item positioned before it. This is considered the most mathematically sound way to guarantee a truly random deck every time the game loads.
The createBoard() function uses document.createElement to build the required HTML on the fly, keeping our original index.html file clean and making the game dynamically scalable. Step 4: Adding the Flip Event Logic
It's time to make the cards interactive. When a player clicks a card, we need to add the CSS class flip to it so it visually rotates.

A split screen showing the JavaScript click event code and a card animating its flip on the web browser.
Add this code to your script.js file, right below the createBoard() function:
What this code does:
In JavaScript, this refers to the specific DOM element that triggered the event. Because we used a traditional function keyword instead of an arrow function (=>), this correctly targets the exact card the user clicked.
this.classList.add('flip') applies the CSS rule we wrote earlier, causing the card to visually rotate 180 degrees.
We utilize a State Machine design pattern: lockBoard prevents bugs by ignoring clicks if the board is animating. hasFlippedCard tells the code whether the user is selecting their first card or their second card. Step 5: Checking for Matches & Resetting the Board
Finally, we need to give our game a brain. Do the chosen emojis match? If yes, keep them face up. If no, flip them back over after a short pause.

A flowchart showing the game logic: Click Card -> Is it a match? -> Yes (Keep Flipped) -> No (Flip back after 1 second).
Add these final helper functions to the very bottom of your script.js:
What this code does:
checkForMatch() looks at the data-emoji attribute we injected into the HTML earlier. If they are identical strings (e.g., 'π' === 'π'), the player successfully found a match.
disableCards() prevents matched pairs from being un-flipped by accidental clicks later in the game.
unflipCards() leverages the JavaScript setTimeout function. This is an asynchronous function that pauses execution for exactly 1000 milliseconds (1 second). This gives the player's brain enough time to memorize the cards before classList.remove('flip') hides them again.π Bonus Step: Testing and Debugging
A core part of becoming a great developer is knowing how to test your code. Open index.html in your Chrome browser. Right-click anywhere on the screen and select Inspect. This opens the Developer Tools.
Click on the Console tab. If you made any typos in your JavaScript, errors will appear here in red text, telling you exactly which line number is broken. If the screen is blank or the cards won't click, the Console is always the best place to start troubleshooting!
π Final Result & Challenges
Congratulations! You have successfully built an interactive Memory Card Matching Game from absolute scratch. You didn't just copy and pasteβyou learned how to dynamically manipulate the DOM, write CSS 3D transforms, implement complex sorting algorithms like Fisher-Yates, and control application state using vanilla JavaScript. These are the exact skills professional software engineers use daily.
Challenge: Take It Further!
Want to test your new skills? Try adding these features:
Add a Stopwatch: Use JavaScript's setInterval() function to track how many seconds it takes the player to finish the game.
Add a Restart Button: Create an HTML button that resets moves to zero, clears the gameBoard container, and runs createBoard() again.
Level Up: Try expanding the baseEmojis array to 10 emojis (20 cards total) and update your CSS Grid to handle a 5x4 layout. π« Learn More at AI Valley
If you enjoyed this project and want to transform your curiosity into career-ready skills, you'll love what we do in our physical classrooms!
AI Valley is the top-rated coding and robotics institute in Zirakpur, serving students across Chandigarh, Mohali, Panchkula, and the entire Tricity area. We are proud to offer the best coding classes for kids in Zirakpur, alongside advanced, comprehensive IT training for college students and adults.
Our expert instructors teach hands-on, project-based curriculums covering Web Development, Python, Artificial Intelligence, and Robotics. Whether your child is a curious 8-year-old taking their first steps in logic building or an ambitious teen preparing for an engineering degree, we have the perfect learning path tailored for them.
Ready to build the future? Visit [aivalley.co.in](https://aivalley.co.in) to explore our courses, or stop by our Zirakpur campus today to enroll at AI Valley and book a free trial class!
Tags
best coding classes for kids in Zirakpurweb development course ZirakpurSTEM education Tricitycoding institute near me Zirakpurkids programming ZirakpurAI classes for kids Chandigarh Mohali Panchkulalearn javascript Zirakpurweb design courses Tricityinteractive coding for kidsAI Valley tutorials