
Build an AI Emotion Reader: Python & Streamlit Tutorial | AI Valley
Welcome back, future innovators! As a senior technical instructor here at AI Valley in Zirakpur, I have the privilege of watching students build incredible, real-world projects every single week. Whether you are a curious middle schooler or an adult looking to pivot into tech, our mission is to bring world-class tech education to the entire Tricity area, including Chandigarh, Mohali, and Panchkula.
Today, we are going to dive into the fascinating world of Artificial Intelligence and Natural Language Processing (NLP) by building an AI Emotion Reader (also known as a Sentiment Analyzer). This is exactly the kind of interactive, highly rewarding project our students build to understand how machines interpret and analyze human language!
🎯 What You'll Build
You are going to build a fully functional Artificial Intelligence Web Application from scratch. Using Python, you will create an "Emotion Reader" that takes any sentence you type and instantly analyzes whether the emotion (sentiment) behind it is Positive, Negative, or Neutral.
Furthermore, you won't just build a script that runs in the background; you will build a beautiful, modern web interface for it using a powerful library called Streamlit. By the end of this tutorial, you will have a real AI web app running in your browser—the exact type of portfolio-ready project students build in our advanced bootcamps at AI Valley!
📋 Prerequisites & Materials
To follow along with this tutorial, you will need a few standard developer tools. If you don't have a computer at home, don't worry! Visit AI Valley's state-of-the-art lab where all materials are provided, and our high-performance workstations are pre-configured for you.
- Python 3.10+: Ensure Python is installed on your system. You can download it for free from
python.org. - VS Code Editor: A professional code editor (Visual Studio Code is highly recommended and industry-standard).
- Command Prompt / Terminal: Basic knowledge of opening your computer's terminal.
- Python Libraries: We will be installing
streamlit(for the web interface) andtextblob(for the AI engine).
Step 1: Setting Up Your Python Environment
Before we can start writing our AI code, we need to prepare our workspace. In professional software development, we always set up a dedicated folder, create a "Virtual Environment" to keep our project clean, and install the necessary libraries. This ensures our project has everything it needs to run smoothly without interfering with other projects on your computer.

A screenshot showing a computer terminal with the pip install command running successfully, displaying download progress bars.
Open your terminal or command prompt, and run the following commands step-by-step:
What this code does:
First, we create a brand-new folder named ai_emotion_reader and navigate inside it. Next, we create a virtual environment (venv). Think of this as a sandbox just for this project.
The pip install command reaches out to the internet and downloads textblob (which contains our pre-trained AI language models) and streamlit (which will magically turn our Python script into a web application). Finally, the download_corpora command downloads the specific linguistic data files (like dictionaries and grammar rules) that TextBlob needs to accurately understand English text.
🧠 Theory: How Does Our AI Brain Actually Work?
Before we write the code, let's understand the science. Parents often ask me what makes our curriculum the best coding classes for kids in Zirakpur and Chandigarh, and my answer is always the same: we teach the "why" behind the code, not just the "how."
In this project, we are using a branch of AI called Natural Language Processing (NLP). Specifically, we are using a technique called Lexicon-based Sentiment Analysis.
When you feed a sentence into TextBlob, it breaks the sentence down into individual words (a process called tokenization). It then checks a massive internal dictionary (the lexicon) where thousands of words are pre-scored for emotion. For example, the word "excellent" might have a score of +0.8, while "terrible" has a score of -0.9. The AI calculates the average of these scores, factoring in modifiers like "very" or "not," to give us a final Polarity Score ranging from -1.0 (extremely negative) to 1.0 (extremely positive).
Step 2: Testing the AI Logic with TextBlob
Now let's test our "AI Brain." We need to make sure the NLP engine is working before we build the website.
Create a new file named test_ai.py in your folder and paste the following code:
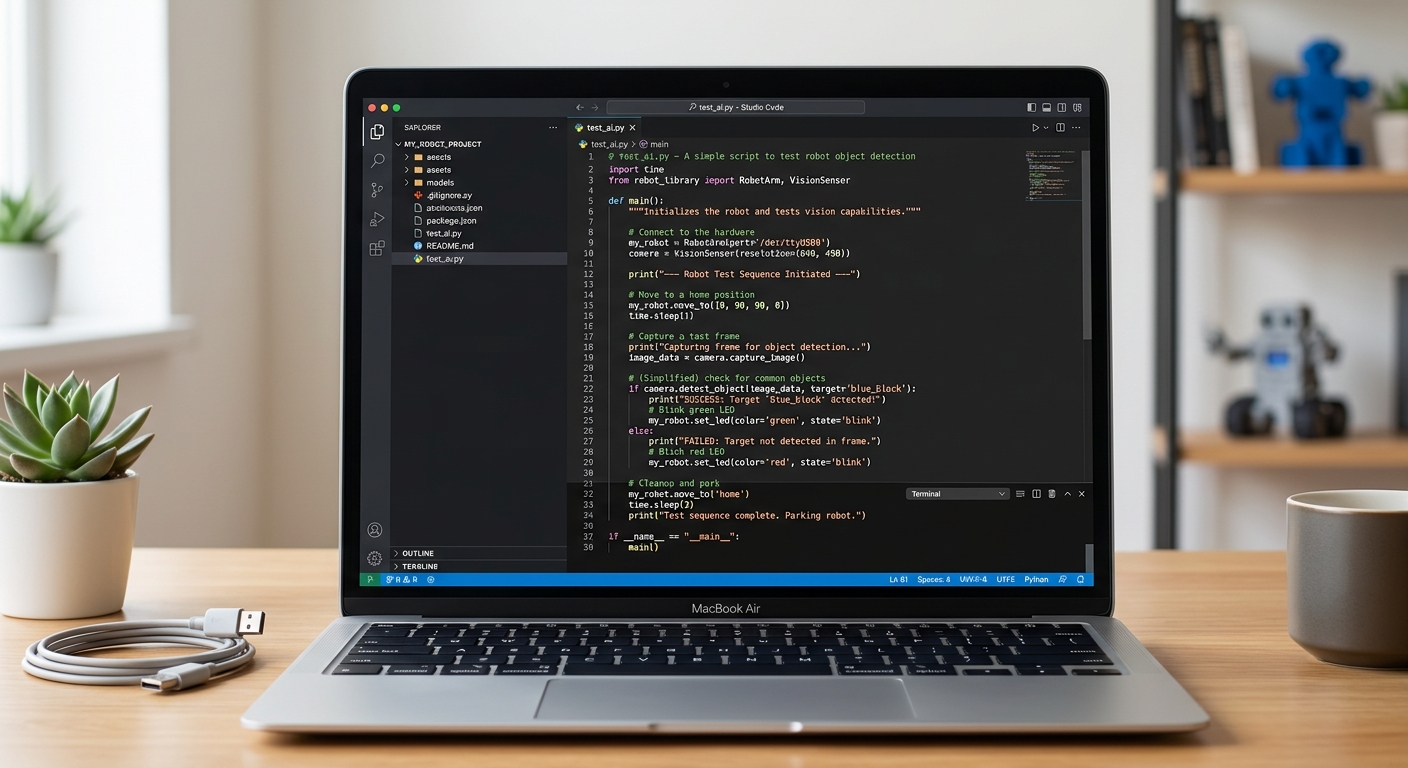
A screenshot of Visual Studio Code showing the test_ai.py script with a clean, dark theme syntax highlighting.
Expected Output:
When you run python test_ai.py in your terminal, it should print:
The text is: 'I absolutely love learning to code at AI Valley!'
The AI Sentiment Score is: 0.625
(Since 0.625 is greater than 0, the AI correctly identified it as a positive and happy sentence!)
Step 3: Building the Web Frontend with Streamlit
A simple terminal output isn't very exciting to show your friends and family. Let's turn this into a visually appealing web app! Rapid prototyping is a core skill we teach in our software engineering modules in Mohali. Students love seeing their backend code come to life in a browser instantly.
Create a new file named app.py in your VS Code. This will be our main web application file.
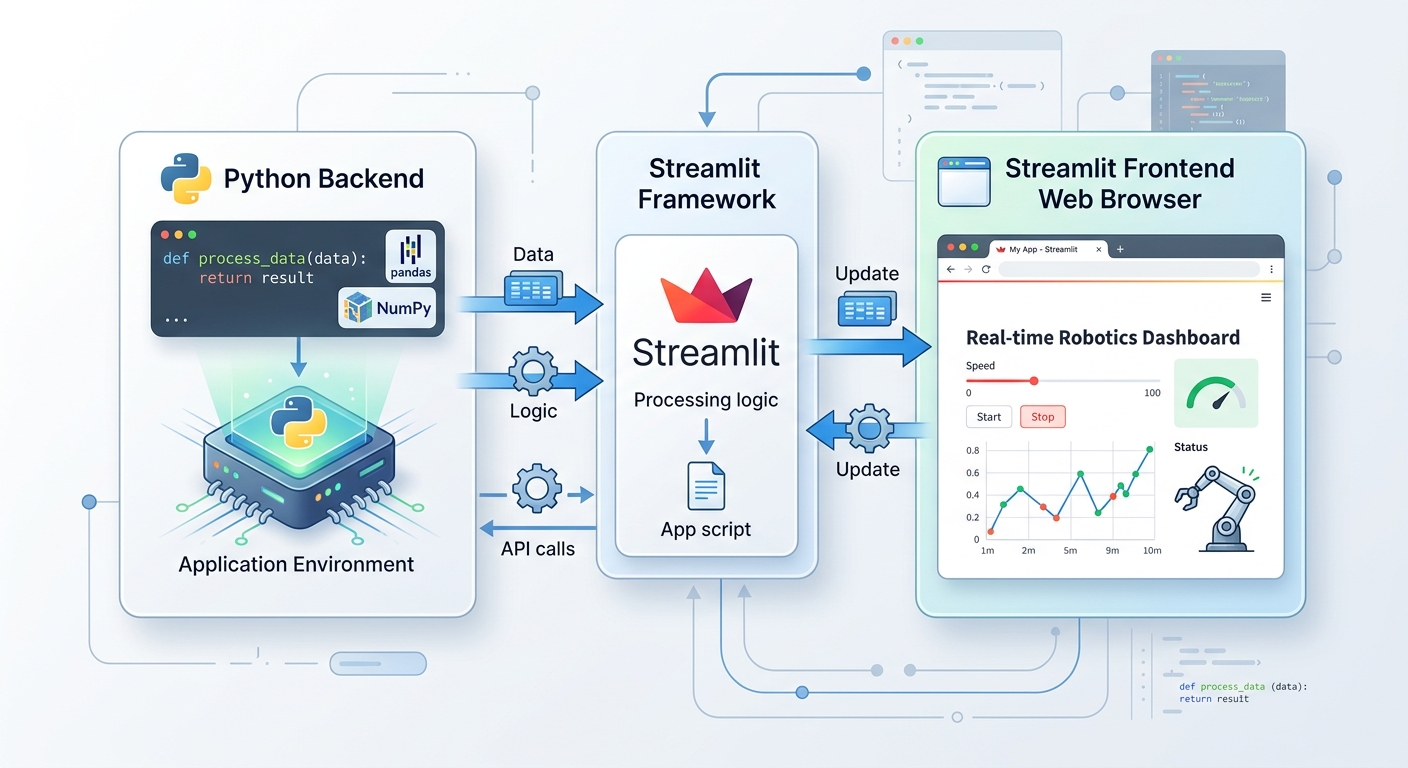
A diagram showing how Streamlit connects a backend Python script to a frontend web browser interface.
What this code does:
We import streamlit as st to save typing. The st.set_page_config function sets the browser tab name and favicon. st.title and st.write print large headings and regular text directly onto the webpage. Finally, st.text_area creates a multi-line text box where our user can type their sentence. The text they type is dynamically stored in the user_input variable.
Step 4: Connecting the AI Engine to the Web App
Now for the grand finale—connecting the user interface (Step 3) to the AI engine (Step 2). We will add a button to our web app. When the user clicks the button, the app will run the TextBlob AI, calculate the polarity score, and display custom messages and emojis based on the result.
Add the following code to the bottom of your app.py file:
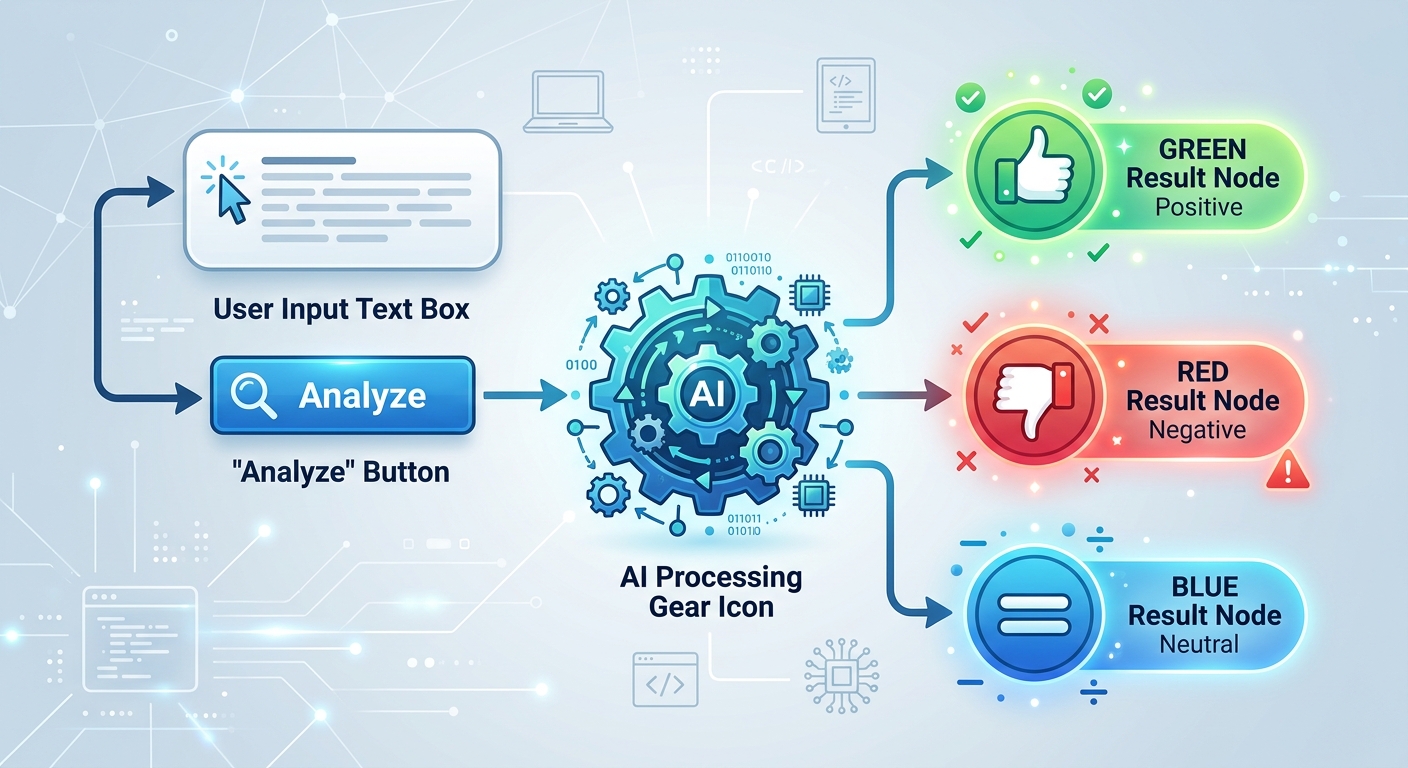
A flowchart showing the if/else logic: User clicks button -> AI calculates score -> Decides if Positive, Negative, or Neutral.
What this code does:
The st.button function creates a clickable interactive button. The if statement checks if the button was actively pressed. If it is pressed, it first checks if the text box is empty (an important QA practice called input validation). If there is text, it calculates the polarity just like we did in Step 2. Then, we use an if-elif-else block to show different colored alert boxes. st.success renders a green box for positive, st.error renders red for negative, and st.info renders blue for neutral. We even added st.balloons() to make positive results fun and interactive!
Step 5: Running and Testing Your Application
Let's deploy our app locally to see it in action! Go back to your terminal, ensure you are still in the ai_emotion_reader folder (and your virtual environment is still active), and run this special Streamlit command:
What this code does:
Unlike standard Python scripts, Streamlit applications require their own local web server to run. The streamlit run command boots up a secure local server and automatically opens your default web browser (like Chrome, Edge, or Safari) to http://localhost:8501, displaying your fully functional app!
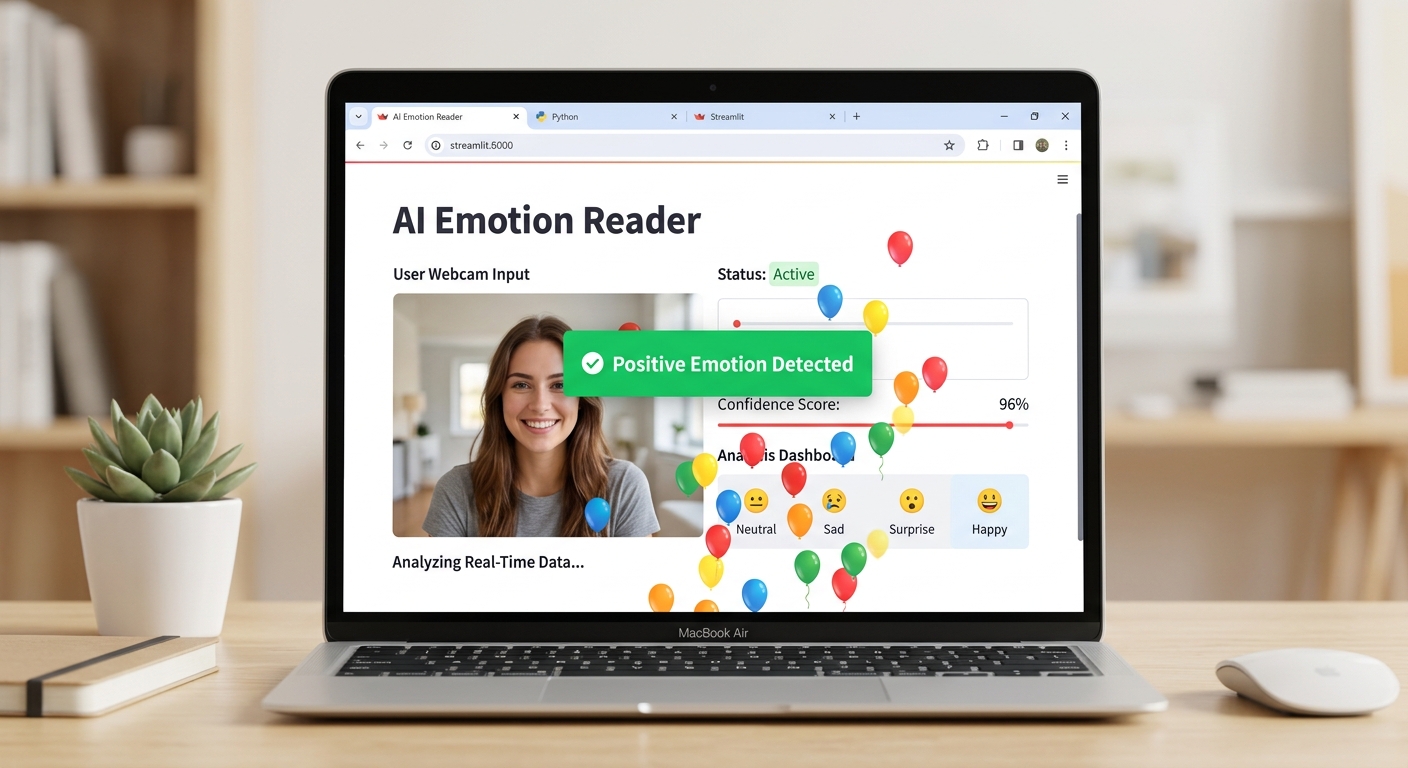
A screenshot of the fully running Streamlit web application in a browser, showing a positive sentiment analysis result with balloons on the screen.
Testing Your App:
🛠️ Quick Troubleshooting
python -m textblob.download_corpora.streamlit run app.py.🎉 Final Result
Congratulations! You have just built a complete, end-to-end Artificial Intelligence Web Application. You learned how to set up a professional Python environment, utilize Natural Language Processing to extract mathematical sentiment scores from human text, and build a modern frontend web interface. These are highly sought-after skills in the modern tech industry. By turning abstract AI concepts into a tangible, interactive web app, you are practicing the true art of software engineering.
🚀 Challenge: Take It Further
Finished early? At AI Valley, we believe in pushing boundaries. Here are three challenges to level up your project:
TextBlob also calculates subjectivity (is the statement a cold hard fact or a personal opinion?). Can you add another section to your app showing the subjectivity score?1.0, display a "Mind Blown 🤯" text!Adding these features is a fantastic way to supplement the STEM education students receive in their traditional schooling.
🏫 Learn More at AI Valley
If you enjoyed this tutorial and are searching for the best coding classes for kids in Zirakpur, Chandigarh, Mohali, or an advanced Python boot camp in Panchkula, look no further. AI Valley is proudly recognized as the top-rated coding and robotics institute in the Tricity area.
Our expert instructors teach hands-on, project-based classes exactly like this one every single week. Whether your child is 7 years old discovering logic through block coding, or 17 years old building advanced Python neural networks, we guide them every step of the way to ensure they become creators of technology, not just consumers.
Ready to start your tech journey? Visit [aivalley.co.in](https://aivalley.co.in) or drop by our campus today for a free trial class. Let's build the future together!